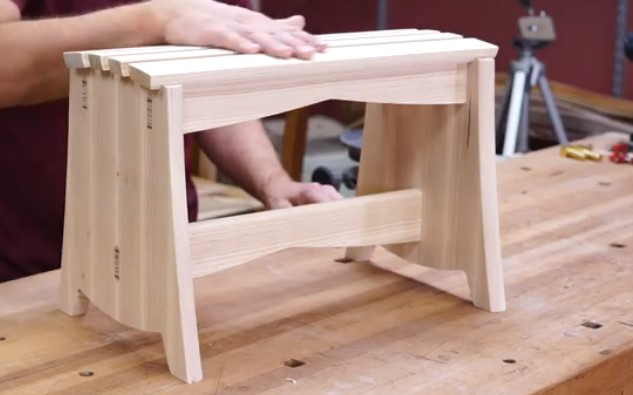
Furniture Making: A Simple Modern Step Stool Plans
The design of the step Stool is modern and sleek. You can use this stool for various purposes. You can use it in your shop, let your kids sit on it, and even as an ottoman. It will be good for all these purposes. When finished, this functional step stool will look really good; plus, the building process itself is fun and packed with woodworking techniques.
While it may seem small in stature, a lot of woodworking goes into this small stool. Making the Step Stool requires ripped and flipped panels, wedged mortise and tenon joinery, handmade edge profiles, and dadoed slats.
This project will help you easily learn about wood selection, grain direction, rip-and-flip panel making, flush trimming, using templates, wedged mortise and tenon joinery, shaping, and creating edge profiles by hand. Let’s start building the Step Stool.
The First Step in Building this Step Stool is Milling
In this project, we have skipped over much of the milling process and only showed what you absolutely need to know. Assuming you know how to joint and plane a board to a specified dimension, let’s take a closer look at the plans and the cutlist to understand how to prepare the parts.
Follow the Cutlist
Here we will also provide you with a set of plans that contain a cutlist. The measurements given in the cutlist are in their final dimensions, so make sure to take a little extra when doing your rough cutting. It is recommended to get all of your parts out of an 8/4 (2”) board. This is especially essential for the side panels so that you can create them through the rip and flip method. You will also get tenon to tenon length and shoulder to shoulder length from the cutlist.
The templates and the materials you are going to need for this project
To make this Step stool, you can use templates to create the main shape of the parts. This is very common in modern day furniture making. Use ¼” MDF material that was cut on a CNC machine. You have a couple of choices when it comes to the templates – You can purchase them or create them. You can definitely make your own templates if you choose to do so. You will need to create a side, top rail, and bottom rail template from ¼” MDF material.
The best way to do this is by first cutting an oversized template blank. Use the provided diagrams to plot out the major points of the template. You will cut these out by hand on the bandsaw and then sand smooth. Gluing strips of sandpaper to a long flexible strip of wood will help to smooth out any imperfections. Don’t forget that the tenons will be ⅜” wide in the finished piece, but in the template, you will need to make the mortises ⅝” wide to be able to fit a ⅝” guide bushing.
You, Will, Need the Following for your Material:
- ¼” MDF (if you do not buy the templates)
- 8/4 board that is at least 7” wide by 40” long
- ⅛” brass rod (other fasteners can be used)
- Wood glue
- Pressure sensitive double stick tape
- 2 Part epoxy glue
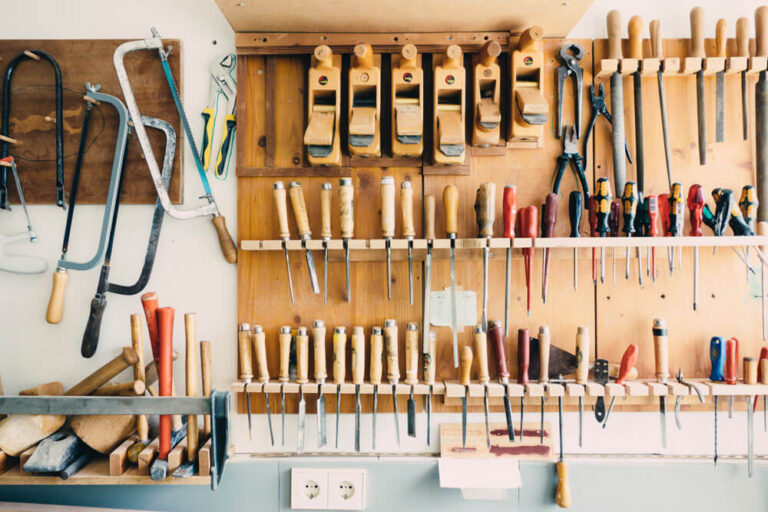
The Tools you are Going to Need for this Project
You can use some of the most common woodworking tools to do the design of this project. You are not going to need a bunch of expensive specialty tools to make this Step stool. You can complete this project using the following tools:
- Router table
- ⅝” Straight Bit (optional)
- Top & Bottom Bearing Flush Trim Bit
- Jointer
- Planer
- Table Saw
- Dado Stack
- Bandsaw
- Plunge Router
- ⅝” Guide Bushing
- ⅜” Spiral Upcut Bit
- Spokeshave
- SandpaperDrill
- and Screwdriver
Step 2 – Lumber and Panels
Create the sides
To begin building the Step stool, first, you need to create the side panels. You can do so with the rip and flip method. This is just another way of saying that you will be creating a slip matched panel on the bandsaw.
First, start off by grabbing a board that is 2” thick by at least 7” wide and at least 12” long for 1 side. Go ahead and mill this board lightly. You don’t have to worry about making it perfect as you will be ripping strips off this board on the bandsaw and will final mill later. Once you have your 8/4 board prepared, it’s a good idea to draw a large triangle across the face and one end so you will be able to keep them organized.
Do Rip and Flip
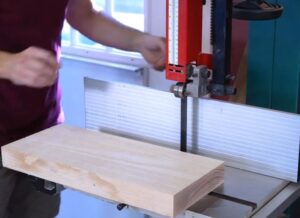
Head over to the bandsaw and set up your fence to cut about ⅞”. You would want to have the final width of your sides to be ¾”. Leaving ⅛” extra from the bandsaw is plenty as long as your bandsaw is cutting straight and your wood does not have a lot of internal tension. Lay your board down on its face and cut 1 strip at ⅞” and halt. Take that strip and place it back on the board.
Check if it looks straight. If it does, you are good to continue cutting strips. If not, you will need to add a little extra to your cut and take your board to the jointer between cuts. If your board is 2” thick, then you will need about 6 strips per side.
Glue the Panel
Now, as all the strips for the side’s panels are ready, go ahead and lay them out in a slip match pattern. Draw another triangle on their face, so you know how to put them back together.
The edges of these boards are flat, but they have not been joined truly and properly. Square up the edges on the jointer before you begin to glue them up. It is recommended to use the in-out method on the jointer. Imagine where each glue line will be – on one side of that line, write “I” on the other, write “O”. This stands for In and Out.
When you joint that edge, you will either position the face in towards the fence or out away from the fence. Why do this? Well, if your jointer is slightly off or out of square, following the in-out method will make sure that those imperfections are on opposite sides in the opposite orientation. This means they cancel themselves out.
This will really help to keep your panels flat. Gluing these sides are a pretty simple task. Grab all your clamps, glue, tape, paper towels, scraper, and anything else you will need. Put two clamps on the underside towards each end. You’ll place one on top in the middle later.
On each side of the strips, place a thick line of glue and spread it out with your finger, and place boards together. Clamp the material lightly. Work your way around the panel and check all the edges to make sure they are remaining flat. Place the third clamp on top and lightly tighten it down. As long as everything is staying flat, you can put more pressure on your clamps and then set them aside to dry.
Time for Milling the Panels

Before milling your panels, at least let them dry for 24 hours. Mill the side panels down to ¾” thick. At this point, the length and width do not matter as long as they are oversized.
Now, there are a lot of people who have now realized that their panel is bigger than their jointer. If not, move on to the next task. So, if you are wondering, “how do I mill a panel that is 11” wide on an 8” jointer? The snarky answer is, “You don’t. You buy a bigger jointer.” But of course, that is not helpful.
So, is it possible to mill an oversized panel? Yes, but it is not the safest process, so please be careful. Let’s say you have an 8” jointer. You’ll start by removing the safety guard on your jointer and pushing your fence back as far as it will go. Lock it down. Next, set your jointer to cut 1/16” deep. Take one pass at a time until you have cleaned that face and created an 8” rabbet.
Now, you need a flat sheet of ¾” MDF roughly 8” wide and the same length as your panel. Double stick tape it down into that 8” rabbet you just created. Flip it back over so that the MDF is down. You now have a flat sled that elevates the unjointed bottom of your board up a little. You can run this board/sled through your planer.
Clean up the top, remove sled, flip over and then clean up the bottom to get a perfectly milled board.
Step – 3 Layout and Templates
Make the Side Templates
 Use the provided diagrams to design the major points of the template. Use a bandsaw and cut these out with your hand and then sand them smooth. Gluing strips of sandpaper to a long flexible strip of wood will help to smooth out any imperfections. Don’t forget that the tenons will be ⅜” wide in the finished piece, but in the template, you will need to make the mortises ⅝” wide to be able to fit a ⅝” guide bushing.
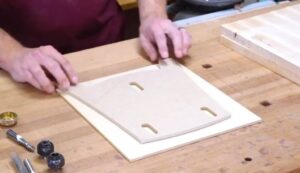
Cut a square blank from ¼” MDF that is 12”x12”. From top to bottom, draw a vertical centerline going. Measure out from this center line and up from the bottom. Next, mark out the horizontal lines that determine the height of the tenons. Measure from the bottom 3-¼” and 9-½” and draw a line that is parallel with the bottom of the template. These are the centers of the mortises. Each mortise is 1-½” tall, so you will split the difference and mark a line ¾” on either side.
You already have your vertical centerline so you can mark 5/16” on either side of the centerline within your bottom mortise. You want the template mortise width to be ⅝” not ⅜”. To find the centerline of the top mortises, measure out 2-½” from the centerline within the top mortise horizontal lines. Make the width of the remaining mortises as you did on the first. You now have three rectangles (⅝” x 1-½”) that are your mortises.
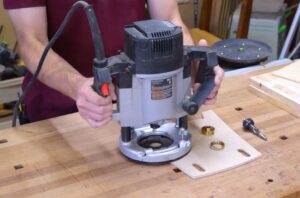 You will need to cut the mortises before you shape the sides. It is recommended to do this on the router table with stop blocks on either side or with a plunge router, a fence, and stop blocks. With your machine turned off, insert your ⅝” straight bit and raise it to ⅛”. Set your fence back, so the bit is perfectly in line with the centerline of your bottom mortise. Set your blocks in a way that the template can only travel 1-½”. Clamp them down securely.
Tilt the template up until only one corner is touching the table, resting against the block. Turn on your machine and slowly lower the template down into the bit. Once it is fully flat on the table, you can then slide it to the opposing stop. Remove the template, raise the bit to slightly past ¼”, and repeat. Since the bit will be protruding through the template, this time, make sure your fingers are safely out of the way.
The process will be very similar to the top mortises. Find the centerline, set fence and stops, tilt-up, turn on the machine, tilt down, slide and repeat. Since your left and right mortise are equal in distance from the centerline, you should be able to flip the template side over side to cover the other mortise.
You are now ready to cut the curves on your template. These are really up to you. Try to stay to the general shape of the plans, but otherwise, you can change the curves however you like. It is recommended to make a few measured marks and then connecting the marks with a flexible ruler to create the curves.
Step 4 – The Sides
Prepare the Mortise
 Now, gather everything you need and set it up to prepare for your mortising. For the mortises in the sides you will be using a ⅜” spiral upcut bit housed within a ⅝” guide bushing. Go ahead and get both of these set up in your plunge router.
Next, let’s set the depth. Since these are through mortises, you want to ensure a clean cut that will look nice. To do so, it is recommended to cut at 75% depth or more before doing a final pass at the full depth. Most plunge routers will have a turret stop. It looks like a disk with a series of screws and shafts sticking out at different heights.
Set your full depth, which is a hair past ¾”, to the middle stop. Now rotate the turret so your router will get stopped a little early on the higher turret.
Grab some double stick tape, your backer board, clamps, and your air compressor or shop vac. In between passes, you will need some way to get the chips out of the mortise.
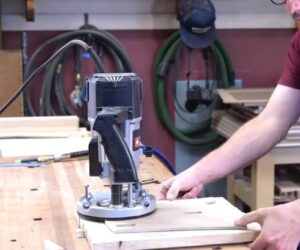
Mortise the Side
 Start by placing a few pieces of double-stick tape onto the back of your template. Place it down on your side material and firmly press down to secure it. Put a backer board under your side and clamp the side and backer board to your work surface.
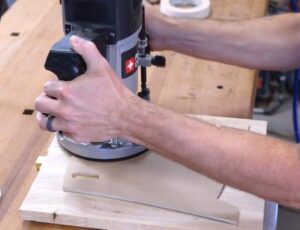
Double-check everything is safely secured and where you want it. Turn on your router and start making small plunges into your mortises, stopping from time to time to blow out or vacuum out the chips. Continue until you have plunged the entire mortise at 75% depth. Turn your turret stop to the full depth position and make a full depth final pass.
Repeat this process for all mortises. If you only have 1 template, then you will want to move on to the flush trimming step before you remove the template to do the mortises on the second side.
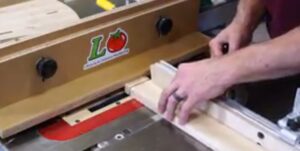
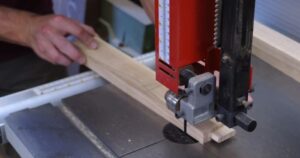
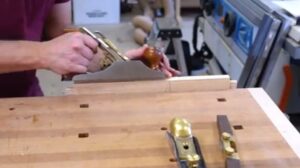
Start Flush Trimming the Sides
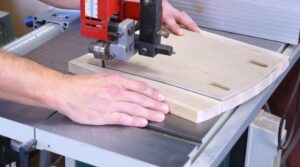 To get the sides ready for flush trimming on the router table, you will need to first cut off the majority of the wood. Flush trim bits work best when they are only cutting about 1/16” of material. Take your side to the bandsaw and cut close to the template without hitting it. Go slow and try to leave no more than ⅛”. Be careful especially, in the small inside curve of the stool legs. You will want to understand the radius of your flush-trim bit before cutting this too tight.
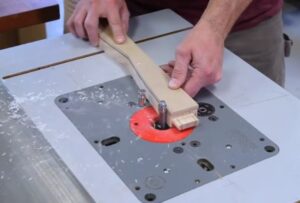
Set up your flush-trim bit while your machine is still unplugged. Raise the bit so that the bearing is riding along with the template on the top. When routing end grain, you will occasionally experience the router being a little grabby. You always want to make sure your hands are out of the way of the bit so that their safety is not a concern. To help prevent potential problems, you will want to make sure you are conventionally cutting – going against the cutting direction and by using a starter pin. A starter pin will help you move the material into the bit slowly and safely.
Take your time with this, but you can go ahead and start flush trimming all sides of your stool side. Keep the router set up, so it’s ready for the second side.
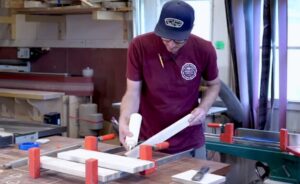
Step 5 – Rails & Tenons
Make the Layout
 It’s time now to start laying out the tenons. There is one major thing to remember in regards to the tenon placement – the top rail tenon is not in the center vertically. It is offset slightly towards the bottom of the rail, so it’s at this point that you will want to determine the top, bottom, and sides of your rail. Grab a tape measure, small ruler, a square, and a sharp pencil, and clamp your rail, so the end is facing up. You need to mark the tenon placement so that you will have a reference when at the table saw.
Begin with the top rail. From the bottom, measure ⅛” and draw a line across the tenon. Mark ¼” from the top. The distance between those two marks should be 1-½”. Now, you want to mark out the cheeks of your tenons. You can either draw a centerline and measure out on either side or mark 3/16” from the outer sides. It doesn’t really matter since these lines are only for reference. You will ultimately be “sneaking up on it” when over at the table saw.
The bottom rail tenon is perfectly in the center. 7/16” from the top and bottom and 3/16” from the left and right sides. Mark them out in the same fashion as the top rail.
Do the Shoulder Cuts
 You will need a crosscut sled and some sort of stop to do the shoulder cuts on the tenons. The good thing is that all the tenons are the same length, so you can set the stop and only have to worry about moving the blade height.
This is where a smart furniture maker would have a test rail ready to work on. It is recommended to do all of your testings on a scrap piece that is milled the same as your final parts.
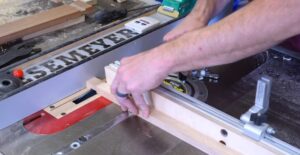
Draw a line going all the way around your rail that is ¾” from the end. With your table saw unplugged, set the rail right up to the blade so it will just be slightly to the right of the line. Set your stop there and clamp it down.
Use any measuring device to set your blade height to cut 3/16”. Make this cut on the faces of all of your tenons. A good tip to remember is that you will not see this initial shoulder cut even on a through tenon, so it’s a good idea to cut a little deeper than your measurement. Make all your 3/16” cuts.
Next, grab your bottom rail and raise the blade to 7/16” and make the 4 remaining cuts on that rail. It is this next rail that you need to pay close attention to. Set your blade height to cut ¼” and make your top shoulder cut. Then, move on to the bottom, and make a cut that is ⅛” deep.
Clear Out the Tenon Waste
 Now, use a dado stacked blade to clear away the waste that is not part of your tenon. Besides the dado set, you will need 1 of 2 things – either an “L” Fence or a sacrificial fence. No matter which one you have, you set the dado stack up to be slightly wider than ¾”, so you can take the waste off in one pass.
Set up your crosscut sled or sliding miter gauge to crosscut the tenon. Line up the shoulder cut you made earlier with the left side of your blade. This is where you will want your stop or your fence to be. Adjust the height of your blade the same way you did with the shoulder cuts. Although you were told earlier to cut a little deeper on the initial shoulder cut, here, you will want to cut a little shallower than your measurement to sneak up on the fit. Cutting more is always possible but putting it back isn’t an option.
Start with the cheeks so you can test the fit width-wise. This is 3/16”. Make one pass, then flip over, make another and then test fit. Do that until you have a perfectly fitting mortise. Repeat the process for the rest of the tenon cheeks.
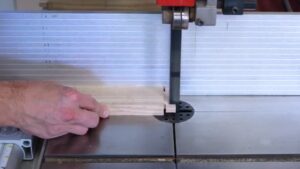
For the remaining edges of the tenons, use the bandsaw due to the speed of setup. There are a few different measurements to set up here, so you may find it much easier on the bandsaw. Set up your fence so you can easily cut on the mortise end lines you drew in the layout stage.
Round the Tenons
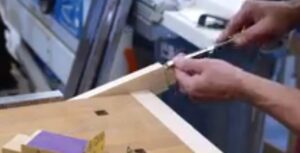
 Now, you need to round the tenons. You can use a ¼” round over bit on the router table to do this. These tenons are pretty small, so it is a good idea to do them by hand with a rasp, chisel, and sandpaper. This is a pretty straightforward process; just remember not to hit your tenon shoulder as that is the part that you will really see. Take your time and test for fit regularly.
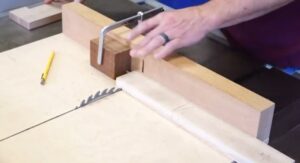
Split the Tenons
 The last thing you need to do is split the tenons. It is recommended to leave about ¼” on either end. Anything more, and you will risk splitting the wood. Head back to the bandsaw and set the blade to cut ¼” from the end of the tenon. You can set a stop, or you can just freehand cut these. Be careful not to cut into your tenon shoulder.
It is ok to stop about ⅛” away from your shoulder to be safe. On the bottom rail that has the tenon perfectly in the center, you can just flip it over to cut the other split. For the top rails, you will need to move the fence.
Step 6 – Shaping
Now, Shape the Rails
 The great thing about shaping the rails is that you already know the process. Take your template and trace the shape on the rails. Take them over to the bandsaw and cut them out while leaving about 1/16” of material from your line. Double stick tape your template down to your rail and head to the router table. Use the same bit as before to flush-trim the excess material off to get the desired shape.
Let’s Talk a Bit about Grain Direction
 In this section, let’s talk a little about grain direction. If you take that rail and you lay it on its edge so that when you look at the face, the grain is going parallel like a horizon – the shape of the rail will form two “hills.”
Ideally, you want to always cut in the downhill direction. This is because when you cut uphill, the wood has nothing behind it and can sometimes tear out. You will have a much better final result when cutting downhill. This is when a flush-trim bit with a top and bottom bearing comes in very handy.
Step 7 – Slats
Test the Fit
 You are in the home stretch. You will be working on the slats now and are going to establish the measurement for the width of the dadoes and their distance apart. The best way to do this is not actually by looking at your plans but from the step stool itself. This far into a project, there are lots of steps and variables at play and plenty of room for making mistakes. A good way to avoid making a mistake with the slat dadoes is to just measure off the stool.
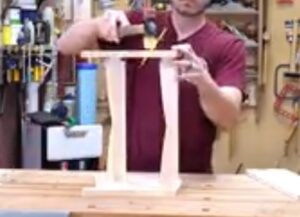
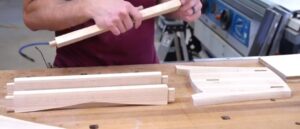
Start by lightly tapping in your rails into one side. Place the other side on top and tap it down with a rubber mallet. When it is mostly together, you can put a clamp on it between the tenons to ensure it is fully seated.
Now you can take your measurements. Determine what your overhang will be – it should be about ½”.
Make the Dadoes
 Head to the table saw and set up your dado blade if it is not already set up. Start by making the blade ¾” wide. We talked about a few fence options earlier, and you can still use whichever you like. However, in this operation, it is recommended to use a block spacer on your fence.
Typically, you do not want your material to have two points of fence contact when cutting. If your fence is not perfectly straight, it can cause pinching, burning, and even kickback.
Clamp a block on your fence towards the front and make your measurements from there. That way, when you begin to crosscut the dadoes, the material is no longer touching two fences. Use your miter gauge and some scrap material to begin making test dadoes. You should have about ½” of overhang but, of course, work from your actual step stool, not the plans.
The test pieces are a great way to find the depth of cut on the dadoes as well. You want your slats to sit down over the side with just a hair gap between the top rails. It is approximately ¼”.
If you have done a full test piece that you are happy with, then you can start dadoing your actual slats.
Step 8 – Profiling, Sanding, and Gluing
It’s Time to Take the Decision
 You now are at the point where you can take some artistic license to make your piece unique. You can lightly sand everything, glue it up and call it a day if you want. Adding a few additional curves, profiles and chamfers can really take this piece to the next level.
Design the Rail Profile
 When it comes to edge profiles, you can either use a router bit, or you can do them by hand. We will be discussing how to make unique edge profiles by hand but using a router table is perfectly fine.
On your step stool, to ease the edges of the top rails, start with a profile on the bottom rail. Draw out a centerline on the top of the bottom rail and a line about ⅛” down on either face. These are the guidelines that you need to work to as you remove material. Grab your handplane and begin to create facets or small chamfers from the centerline down to your guidelines. The handplane should remove the bulk of the material for you.
Grab your sanding block of choice and some sandpaper, and work your profile to make those facets smaller and smaller until you have a smooth curve. If you have some sort of flexible material, you can create your own flexible sanding block that works great for these profiles. Work your way up the grits until you are happy with the look and feel of the edge profile.
Design the Side Profile
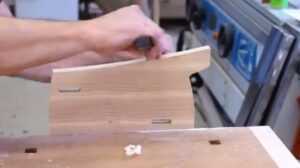 On the sides of the stool, you need to make your profile slightly asymmetric so that there is more of a curve on the inside. It may look like they are pointing inward and grounds the piece.
For the sides, the basic process is the same as the rails. Make your guidelines and use a spokeshave to remove the majority of the material. The main difference here is that you need to pay attention to the grain and make sure you are cutting downhill. Create your facets and then sand them smooth.
It’s Time to Sand
After creating the profiles on all the edges that get them, it is time to sand the faces of the parts. You can just use a block on the small parts, but then you can use your orbital sander on the sides. Don’t worry about the outside face of the sides yet since you will be doing your wedging and flush cutting there.
Spend the most time on your coarsest grit. You are trying to remove the machine marks left from the milling process. You should use the finer grits just to remove the striations from the grit before, and it should go much faster.
Glue Up and Gather Everything
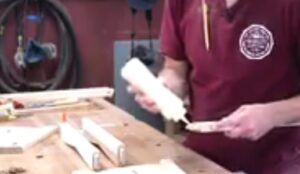 For this glue up, go ahead and grab all your tools and supplies, so you have everything at arm’s length. You will need to have your wedges ready to go as well. If you don’t have any wedges, you can make some very easily.
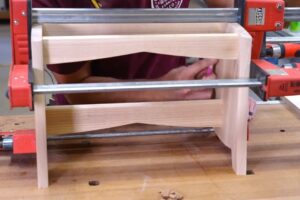
In a normal mortise and tenon situation, you should put most of the glue in the mortise. With this being a through mortise, you need to put glue on both the mortise and the tenon. You need to work quickly but don’t hurry yourself to the point of making a mistake. Place glue on both the tenon and the mortise and use a mallet to put the joint all the way together. Continue until you have all the rails on one side. Apply glue to the other side and attach the remaining side.
Grab a couple of clamps and slowly begin to apply pressure to the step stool sides. Make sure the clamps are as close to the mortise as they can be without touching it. Do not put so much pressure on the piece to the point where it begins to distort. You need to insert your wedges while the glue is still wet, so work quickly.
Insert the Wedges
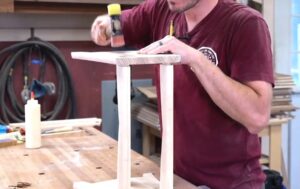 You can use the same wood or a contrasting wood as long as the grain is running in the correct direction. You will want to insert the wedges while the glue in the joint is still wet. Use a lightweight hammer to gently tap the wedges into the joint. It is recommended to tap a few times on each wedge while switching back and forth. You can listen to the sound of the wedge while tapping, as it can be helpful. You will hear a change in tone when it is all the way in.
While the glue is drying, you can clean up the squeeze-out. After everything has dried, you can cut off the wedges with a flush-trim handsaw. Sand the outsides now that you have cut off the wedges.
Put the Finishing Touch
Putting a few coats of finish on before you attach the slats will make your life much easier. Since you have already glued up your stool, you can use a wipe-on finish that is easy to apply.
Attach the Slats
 You have a lot of options for attaching the slats. You can use screws and then fill in the hole. You could use brass screws with an elongated head that can be cut off to resemble a brass pin, or you can use an actual brass rod.
If you are using brass pins, you will want to take your ⅛” brass rod and cut it down to small pins about 2” long. Test fit all your slats and draw a few pencil lines so you can easily line up your brass pins. Pre-drill your ⅛” holes. Use a 2 part epoxy to lubricate and glue in your brass rods.
Read the instructions that come with your epoxy to determine the dry time. Use a file to trim them down after the epoxy has fully dried. It is better to take one more sanding pass on the slats, apply the finish, and then you’ll be all done.
Final Thoughts
Thank you so much for reading and following this project. We really hope you learned a lot and came out the other side with an amazing step stool. Don’t be a stranger – share your project and let us know how it went. Take a look at the other projects we have and let us know what you’d like to see next.
Thanks so much. Happy woodworking!
Table of Contents
![How To Make a Tapered Coffee Table? [Plans Included]](https://woodworkingarena.com/wp-content/uploads/2021/06/Tapered-Coffee-Table-1.jpg)
![15+ Free Real Life Workbench Plan Projects and DIY Design-2024 [Workout Plan]](https://woodworkingarena.com/wp-content/uploads/2018/02/Workbench-Plan-768x399.jpg)