
How to Use Router Bits Properly?
Woodworking demands tons of fine-tuning and attention to detail from the person at the work station. Thus it is important to always keep informed about the right procedures. If you visit a woodworking shop, you can find a wide range of choices on router bit – different sizes of shanks, types of the tip, profiles, and more.
Routers are among the most versatile tools you can have in this field, and the center of this attribute will be on the bits. In this guide on how to use router bits properly, we will show you a definitive step-by-step process on how to succeed in this task of yours, with an overview of these bits.
Types of Router Bits
Beforehand, it is necessary that you learn about the specific kinds of router bits. The way to use these properly will also depend on their types.
Profile Bits

These router bits will let you create sophisticated custom moldings for your cabinetry, furniture, and trim work, ideal for every home. They include beads, chamfers, coves, and decorative ogees. These are available in a variety of sizes, and every woodworker may also mix and match these.
Joinery Bits

With the right bit and your router, you can produce the finest joinery. Several brands offer bits for cutting time-honored dovetails, 45-degree lock miters, box joints, finger joints, rabbets, and more.
Matched Bits

This type exists in pairs for cutting your mating joints, including stile-and-rail profiles and tongue-and-groove, for creating doors for your cabinets. Many companies offer different sets that you can adjust toward the perfect fit with your plywood.
Slotting and Straights

Slotting bits are the router bits that cut parallelly with your router base. On the other hand, straight bits are cutting perpendicularly with the router base.
Aluminum and Plastic Bits

As the name suggests, these bits are for industries that utilize aluminum and plastic materials
Flush Trim and Pattern Bits

Compared with other types of router bits, this kind is best for industries that require more massive production. Nonetheless, the flush trim bit features a guide bearing on its end. Pattern bits, meanwhile, feature this bearing on the shank.
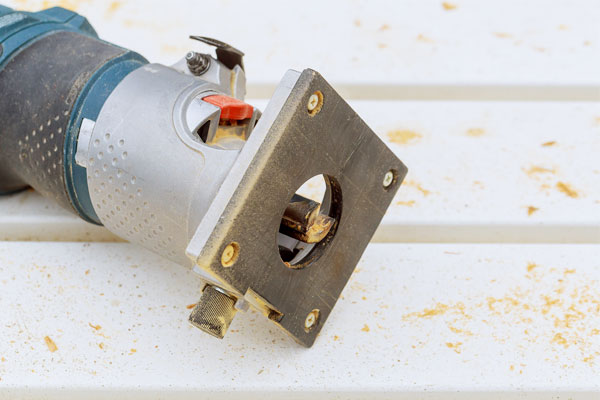
How to Use the Router Bit?
You can optimize using these tools for any woodworking project you find yourself into.
Step 1: Plan Ahead on Guiding the Cut
First, plan on guiding your cuts before turning on the power source. It is common for router bits to have their guide bearing. However, you can also find straight bits that require fences to guide every cut.
Step 2: Unplug the Router
This is for safety purposes prior to mounting any router bit with the router. Make sure to clamp the bit in the collect though inserting shank until the right depth.
Step 3: Refrain from Carbide Damage
While mounting bits, never allow them to make contact with your steel collet rings and wrenches in the plate of the router table. Doing so may damage the tips of the carbine, due to the impact upon the hard surface.
Step 4: Keep It Clean and Sharp
Always clean the residue from your bit surfaces using a commercial cleaning tool. If you find that the tool resists feed, then you know it needs cleaning. For sharpening, it is best to consult with the experts to avoid any problems. Doing so will extend the life span of your bit.
Step 5: Learn Proper Storage
Aside from maintaining cleanliness, it is very helpful that you store these router bits properly. You may practice the right cleaning methods, but without proper storage, you also cannot expect these to last with you for a longer period of time. Don’t just toss them into the drawers.
Step 6: Know the Accurate Feed Rate
While there is no specific speed for the feed, having these at the right speed rate will let your router be used further. Failing to do so will shorten the life of the carbide since you are pushing the router to its peak. The wood surface and the chips will determine the ideal speed rate.
Step 7: Match the Speed to the Router Bit Diameter
Routers will have variable speed motors. You can now easily match these two with just a few clicks or dial spin.
Take note that larger bits tend to have a higher rim speed than smaller diameter bits, especially if run at similar RPM. Avoid running the large panel raising router bit at higher RPM as well to prevent the instance of overheating.
Final Words
Part of the guidelines on how to use router bits properly is to keep everything within safety measures. It includes using eye and hearing protection, as well as having the right accessories like power cords, feather boards, and more. Bear this in mind to always keep every woodwork at its finest.
Other Information You Need to Know
![How To Clean Stainless Steel Appliances? [Tips & Tricks]](https://woodworkingarena.com/wp-content/uploads/2018/08/Stainless-Steel-Appliances-1-768x511.jpg)


Hey John, I’ve attempted using three separate 1.5″ flush trim 1/4″ shank bits with bearings above and below to reproduce a guitar template with scary results. The first blew out the berings. The second bit after about 5 seconds of use made a noise and flew out of the router bending the bit shaft significantly. No injuries. Buying a new Dewalt router the third bit also made a noise after about 10 sec. of use and jumped again slightly bending the shaft. The wood is mahogany. Mabye too slow on rpms?? Mabye need a 1/2 bit shaft?? Mabye make sure the bit is American made? Ever dealt with this? Any thoughts? Thanks Rob