Master the Art of Wood Joints: A Comprehensive Guide for Woodworkers
Wood joints are an essential aspect of woodworking, providing the necessary connections between pieces of wood in a structure or project. From simple butt joints to complex dovetail joints, these connections play a crucial role in determining the strength and stability of the final product.
Understanding different types of wood joints and their applications is essential for both novice and experienced woodworkers. This article will explore some of the most common types of wood joints, their uses, and their relative strengths and weaknesses. Whether you are building furniture, cabinetry, or structures, having a solid understanding of wood joints is a fundamental part of crafting a successful and durable end product.
History of Wood Joints
From ancient times to modern times, wood joinery has had its role in every civilization. Greek, Egyptian, Roman, Chinese, Japanese are still carrying those ancient examples of Woodworking, culture, tradition, and technics. In the primitive age, weapons, as well as shelter, were made by woods. So back then, Carpentry was the primary requirement to survive. Archaeologists found the sign of ancient weapons like wooden clubs and digging sticks at the Kalambo Falls on the Kalambo River on the border of Zambia and Tanzania.
Egyptian drawings of 2000 BC depicts wooden furniture like bed, chairs, stool, tables, and chests. The wood-crafted sarcophagus (Egyptian coffin) still astonishes us with the building technics and designs. With the help of axes, adzes, chisels, pull saws, and bow drills, ancient Egyptian woodworkers created such masterpieces that still keep us hypnotized. Egyptologists found the world’s oldest plywood in the third dynasty coffin, six layers of wood, four millimeters thick.
Ancient Chinese civilization also promoted Woodworking. It is believed in 720 BC, Carpentry boomed in that country, and the Chinese developed many sophisticated technics including precise measurements needed for making pots, tables, and furniture.
Apart from them, early Japanese, Romans, and many more civilizations have Carpentry’s glorious history, which shaped modern woodworking technics. Even it is believed the Ark of Noah was made of wood according to God’s wish and was furnished by him.
Advantages and Benefits of Wood Joints
- Strength: Wood joints provide great strength and stability to a structure, making it less likely to break or collapse under stress.
- Versatility: There are many types of wood joints, each with advantages and capabilities. Woodworkers choose the best type of joint for each specific project, depending on factors such as the size, weight, and intended use of the finished product.
- Customizability: It is customized to fit the specific needs of each project, such as the size and shape of a joint, to accommodate different types of wood or to fit into tight spaces.
- Aesthetics: This can add a decorative element to a project and contribute to its overall appearance. Some types of joints, such as dovetail or finger joints, are especially prized for their decorative qualities.
- Durability: When properly made and installed, wood joints can be extremely durable, lasting for many years and holding up well even under heavy use.
- Ease of Use: Many types of wood joints are easy to make, requiring only basic woodworking skills and tools, making them accessible to many people and a great choice for many projects.
- Cost-effectiveness: Wood joints are a cost-effective option for many woodworking projects, as they can be made from readily available materials and do not require specialized tools or equipment.
- Increased Functionality: Wood joints can add functionality to a project, allowing for movable parts or the ability to disassemble a piece for transportation or storage.
- Environmental Sustainability: Wood joints can contribute to the overall sustainability of a project, as they can be made from sustainably harvested wood and often use less material than other types of joints.
- Improved Safety: Properly made and installed wood joints can improve the safety of a project, reducing the risk of collapse or other safety hazards.
Types of Wood Joints
Butt Joint

A butt joint is a wood joint where two pieces of wood are joined together at the end of one piece with the other. It is the simplest type of joint and is often used for basic woodworking projects such as building a box or a shelf. Additional support can be provided for the butt joints – such as screws or nails. However, it is not as strong as other joints, such as a dovetail, mortise, or tenon joint. The main advantage of a butt joint is its simplicity and ease of use. It can be made quickly with basic tools and does not require a high skill level.
Butt joints are commonly used in various woodworking projects because of their simplicity and ease of use.
Tips & Uses
- Building basic wooden boxes and crates: A butt joint is often used to connect the sides of a box or crate.
- Making shelves and bookcases: Butt joints are commonly used to connect the shelves to the sides of a bookcase or shelving unit.
- Building frames: Butt joints can connect the corners of a frame, such as a picture frame or a door frame.
- Building fences and decks: Butt joints are often used to connect the boards in a fence or deck.
- Making furniture: Butt joints are commonly used to connect the legs to the top of a table or the sides of a chair.
- Building structures like sheds, cabins, and outhouses
- They make basic wooden toys and crafts.
- Framing and construction
Lap joint
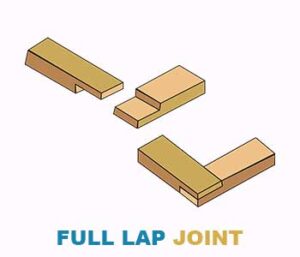

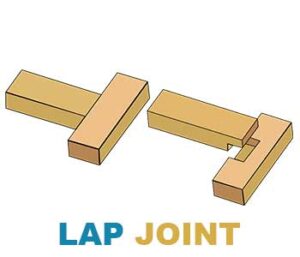
A lap joint is a type of wood joint where two pieces of wood overlap each other. It is a strong joint often used to connect two pieces of wood at a 90-degree angle. Lap joints can be used in various woodworking projects, such as building frames, furniture, and structures.
There are five types of lap joints:
- Half Lap Joint: This joint involves cutting both pieces of wood to half their thickness and overlapping them to form a 90-degree angle.
- Cross Lap Joint: This joint involves cutting both pieces of wood at a 45-degree angle, then overlapping them to form a 90-degree angle.
- T-Lap Joint: This joint involves cutting a T-shaped slot in one piece of wood and a corresponding tongue in another, which is then inserted into the slot to form the joint.
- Mitered Lap Joint: This joint is similar to the half lap joint, but the cuts are made at an angle to create a more decorative appearance.
- Blind Lap Joint: This joint is similar to the half lap joint, but the overlapping portion is not visible outside.
Tips & Uses
- Furniture: Lap joints are commonly used in furniture making, especially in constructing chairs, tables, and desks. They provide a strong and stable connection between the legs and the frame of a piece.
- Cabinetry: Lap joints can be used to construct cabinets and other storage units, providing a strong and durable connection between the unit’s sides and back.
- Carpentry: Lap joints can be used in carpentry and construction projects, such as building walls, frames, and other structures.
- Precise Cutting: To ensure a tight and secure fit, it’s important to make precise cuts when creating a lap joint. Use a sharp blade and a measuring tool to ensure that each piece is cut to the correct length and width.
- Wood Selection: Choose straight and free wood from knots, as these imperfections can weaken the joint and make it more likely to break.
- Glue Application: When gluing a lap joint, apply a generous amount of glue to both sides and spread it evenly to ensure a strong and permanent bond.
- Clamping: Clamping is important in ensuring a tight and secure lap joint. Use clamps to hold the pieces in place while the glue dries, and ensure that the clamps are tightened securely.
Biscuit Joints
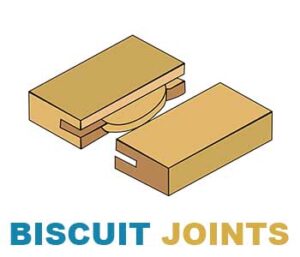
A biscuit joint is a wood joint that uses thin, oval-shaped wooden biscuits, typically made from beech wood, to connect two pieces of wood. The biscuits are glued into slots that are cut into the wood using a biscuit joiner, and then the two pieces are clamped together until the glue dries. This results in a strong, stable, and seamless connection between the two pieces of wood.
Uses and Tips:
Biscuit joints are commonly used in furniture making, cabinetry, repair, construction, and other woodworking projects that require strong and stable connections between two pieces of wood.
- Align and clamp pieces accurately: When making a biscuit joint, it’s important to align the pieces and clamp them together securely until the glue has dried. This will help to ensure a tight and precise fit and maximize the strength of the joint.
- Choose the right biscuit: Biscuits come in different sizes, depending on the thickness of the wood you’re joining. Choose the right size biscuit to ensure a tight fit and strong joint.
- Use quality glue: For a strong and durable biscuit joint, it’s important to use high-quality, water-resistant wood glue. This will help to ensure a permanent bond, even in the face of moisture and humidity.
- Consider the grain direction: When making a biscuit joint, it’s important to consider the direction of the grain. For the strongest joint, the grain should run perpendicular to the joint.
- Reinforce joints with dowels or screws: To further reinforce biscuit joints, you can use dowels or screws in addition to the biscuits and glue. This will help provide additional strength and stability, especially for joints subjected to heavy loads.
Pocket Joint
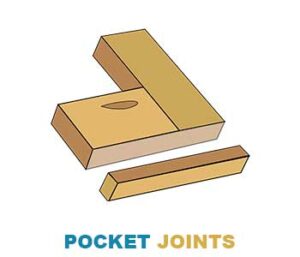
Pocket joints are another wood joinery that involves making a slot by drilling on the two boards that are supposed to be attached. The fasteners that attach two pieces of wood are pocket hole screws. The pre-drilling must be accurate for a pocket joint, and it is better to use a commercial jig. Typically pocket joints are very strong and easy to make. However, the main drawback of it could be more visibly appealing. So this joint is usually used where they are not visible, like cabinet face frames and similar applications, or for temporary use.
Tips and Uses
- Select the Right Wood: Make sure you’re using a type of wood that is strong enough to hold the weight of the project.
- Use the Right Screws: Use screws specifically designed for pocket joints, as these are stronger and will hold the joint together better.
- Drill at the Correct Angle: The angle of the hole is crucial for the strength of the joint. Use a jig or a drill guide to ensure that the holes are drilled at the correct angle.
- Apply Glue: In addition to the screws, you can use glue to reinforce the joint and make it even stronger.
- Practice: Pocket joints can be difficult to get right, so it’s a good idea to practice on scrap pieces of wood before you start your actual project.
Japanese Wood Joints

Japanese wood joints, also known as Kumiko, build traditional Japanese houses. In this technology, the grooved wood pieces are joined together to create a sturdy tree dimensional structure. The history of Japanese joinery goes back to Heian Period when temples and dwelling houses were built using this technology. It passed from generation to generation, and even now, it is one of the most reliable wood joinery technics for carpenters. I know it sounds complex, but you should check Japanese Joinery – Kane Tsugi to get a clear idea.
Types of Japanese Joinery and Uses
- Dobari Joint: This joint is commonly used in constructing boxes, chests, and other storage containers. To ensure a tight fit, the tongue-and-groove cuts should be made precisely, and the joint should be tightly assembled.
- Shimaki Joint: This joint is often used in constructing furniture and cabinets, as it provides a strong and stable connection. To ensure a tight fit, the dovetail and mortise cuts should be made precisely, and the joint should be tightly assembled.
- Mitokigumi Joint: This joint is commonly used to construct circular wooden structures, such as lanterns, ornaments, and furniture. To ensure a strong and stable structure, the pieces of wood should be evenly spaced, and the cuts should be precise and uniform.
- Domaru Joint: This joint is commonly used in the construction of furniture and cabinetry, as it provides a strong and durable connection. To ensure a tight fit, the mortise and tenon cuts should be made precisely, and the joint should be tightly assembled.
Rabbet
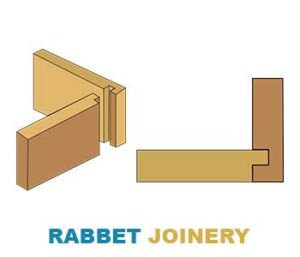
The Rabbet joint is a wood joint used to join two pieces of wood together at an edge. It consists of a rectangular cut-out, or “rabbet,” which is made along the edge of one piece of wood, and a matching tongue, which is cut on the end of the other piece of wood, which fits into the rabbet. The joint is typically secured with glue and/or nails or screws.
Uses and Tips:
- Joining two pieces of wood along an edge: The Rabbet joint is commonly used to join two pieces of wood along the edge, such as in the construction of cabinets, boxes, and other types of furniture.
- Reinforcing corners: It can also be used in woodworking projects by creating two rabbets that intersect at a right angle.
- Hanging doors: Joints are also commonly used in hanging doors, as the tongue on the door fits into a matching rabbet cut into the door frame.
- Clamp properly: Use clamps to apply even pressure and ensure that the joint is tight.
- Reinforce with fasteners: Consider using nails or screws to reinforce the joint, especially in applications where the joint will be subjected to heavy use or stress.
Sliding Dovetail
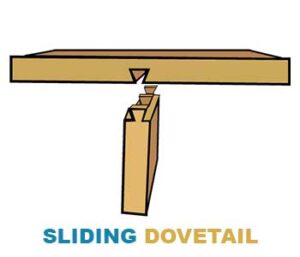
A Sliding Dovetail joint is a wood joint that uses a dovetail-shaped cut to join two pieces of wood together. The dovetail shape creates a tight, interlocking fit that provides strength and stability to the joint.
Sliding Dovetail joints are often used in furniture and cabinetry to connect the sides of a piece to the front or back or the top or bottom to the sides. The joint allows for slight movement between the two pieces, which can be useful in preventing cracking or warping due to seasonal changes in humidity.
Tips and Uses:
- Joining corners: commonly used to join two pieces of wood at a corner, providing a strong and stable connection that can withstand stress and movement.
- Creating drawers: The joint is often used in the construction of drawers, as it provides a secure connection between the sides of the drawer and the front and back pieces.
- Joining furniture components: It is also used to join various components in furniture construction, such as the legs to the rails of a table or the back to the sides of a chair.
- Dry fit first: Dry fit the joint before applying glue to ensure a good fit.
- Clamp properly: Use clamps to apply even pressure and ensure that the joint is tight.
- Sand smooth: Sand the joint to eliminate rough edges and ensure a seamless appearance.
Bridle Joint
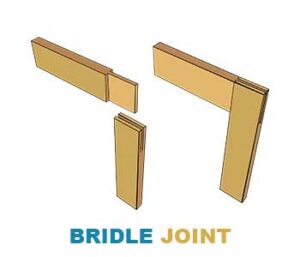
The Bridle joint is a wood joint used to join two pieces of wood at a right angle, creating a strong and stable connection. This joint is often used in furniture construction, cabinetry, and other woodworking projects.
The Bridle joint consists of a tenon cut into one piece of wood that fits into a corresponding mortise cut into another. The joint is secured with glue and may be reinforced with nails or screws.
Professional woodworkers appreciate the Bridle joint for its strength, stability, and versatility, as it can be used in various applications and adjusted to accommodate different thicknesses of wood. Additionally, the Bridle joint can be combined with other joints, such as the Mortise and Tenon joints, to create even stronger connections.
Uses And Tips:
- Furniture construction: The Bridle joint is commonly used to construct furniture, such as chairs, tables, and bookcases, providing a strong and stable connection between components.
- Cabinetry: The Bridle joint is also used to construct cabinets and other wooden storage units, providing a secure connection between the sides and the shelves.
- Joint reinforcement: The Bridle joint can also be used with other joints, such as the Mortise and Tenon joints, to reinforce the connection and increase its strength.
- Accurate cuts: It is important to make accurate cuts when creating the Bridle joint, as a tight fit will ensure a strong joint.
- Use a guide: Consider using a guide or jig to help make consistent cuts and ensure accuracy when creating the joint.
- Reinforce with nails or screws: In addition to glue, the Bridle joint can be reinforced with nails or screws to increase its strength and stability.
Dowel Joint

The Dowel joint is a wood joint created by inserting dowels, cylindrical rods made of wood or other materials, into drilled holes in two pieces of wood. The dowels are then glued into place, creating a strong and stable connection between the two pieces of wood. The Dowel joint is commonly used in furniture construction, cabinetry, and toy making and is known for its ease of use, versatility, and strength. By using a dowel jig, carefully drilling the holes, and properly clamping and gluing the dowels, a professional woodworker can create precise and reliable Dowel joints in their projects.
Uses and Tips:
- Furniture construction: The Dowel joint is often used to construct furniture, such as chairs, tables, and cabinets, to connect components.
- Cabinetry: The Dowel joint can join cabinet components, such as the sides and shelves, for added stability.
- Toy making: The Dowel joint is also commonly used to create wooden toys, such as puzzles, blocks, and cars.
- Use a Dowel Jig: A dowel jig can help ensure accurate placement and alignment of the dowel holes.
- Drill Holes Carefully: When drilling the holes for the dowels, drill them straight and at the correct depth to ensure a good fit.
- Use a Drill Stop: A drill stop can help control the hole depth and prevent over drilling.
- Glue the Dowels: Apply a small amount of glue to the dowels and insert them into the holes. Wipe away any excess glue before it dries.
- Trim the Dowels: Trim the dowels’ ends flush with the wood’s surface to ensure a seamless appearance.
Cross Dowel Joint

The Cross Dowel joint is a type of wood joint in which two pieces of wood are joined together by inserting a cross-shaped dowel through holes drilled at 90-degree angles. The dowel is then glued into place, creating a strong and stable connection between the two pieces.
Uses and Tips:
The Cross Dowel joint is commonly used in woodworking projects for its ease of use, versatility, and strength. It is often used in furniture construction, cabinetry, and the creation of wooden toys and crafts.
- Use a Cross-Dowel Jig: A cross-dowel jig can help ensure accurate placement and alignment of the cross-dowel.
- Drill Holes Carefully: Take care to drill the holes straight and at the correct depth to ensure a good fit for the cross-dowel.
- Apply Even Pressure: Use clamps to apply even pressure during the gluing process and ensure a tight joint. Also, make sure to wipe away any excess glue before it dries. By following these tips and using high-quality materials, a professional woodworkers can create strong and durable Cross Dowel joints in their projects.
Mitre Joint
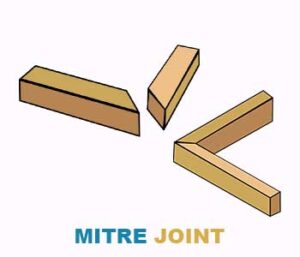
The Mitre joint is a wood joint in which two pieces of wood are joined at an angle, typically at a 45-degree angle. The joint is formed by cutting the ends of the two pieces at a precise angle and then gluing them together.
Uses and Tips:
The Mitre joint is commonly used in woodworking to create boxes, picture frames, and other similar structures. It is also often used to create trim work, moldings, and baseboards.
- Use a Mitre Saw: A mitre saw makes precise cuts and is essential for creating accurate Mitre joints.
- Make a Test Cut: Before cutting the final pieces, make a test cut to ensure the angle is correct.
- Clamp and Glue: Clamp the pieces together while the glue sets to ensure a tight joint. Also, apply even pressure and wipe away any excess glue.
- Use a Mitre Joint Jig: A mitre joint jig can help ensure accurate cuts and alignment, making the process easier and more precise.
Box Joint
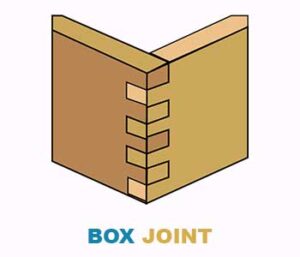
The Box Joint is a type of wood joint commonly used to construct boxes, drawers, and similar structures. The joint is formed by cutting interlocking fingers on the ends of two pieces of wood and then gluing them together.
Uses and Tips:
The Box Joint is a universal joint used in various woodworking projects, including constructing wooden boxes, drawers, and other storage containers. It is also commonly used to construct jewelry, toy, and other decorative items.
- Use a Dado Blade: A dado blade helps create precise cuts and is essential for creating accurate Box Joints.
- Make a Test Cut: Before cutting the final pieces, make a test cut to ensure that the cuts are accurate and to determine the best size for the fingers.
- Clamp and Glue: Clamp the pieces together while the glue sets to ensure a tight joint. Also, apply even pressure and wipe away any excess glue.
- Use a Box Joint Jig: A box jig can help ensure accurate cuts and alignment, making the process easier and more precise.
Dovetail Joint
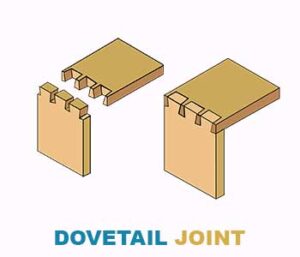
The Dovetail Joint is a type of wood joint commonly used to construct furniture, boxes, and other wooden structures. It is characterized by the interlocking “V” shape of the tails and pins, which creates a strong and stable joint.
It is commonly used in furniture making, cabinetry, and other woodworking projects where a strong and stable joint is required. They are often used to join the sides of a piece to the front or back or to connect the top or bottom to the sides.
Uses and Tips:
The Dovetail Joint is often used to construct drawers, chests, and other types of furniture, as it provides a strong and attractive joinery option. Due to its strength and visual appeal, it is also commonly used in constructing boxes, such as jewelry boxes and keepsake boxes.
- Use a Dovetail Jig: A dovetail jig can help ensure accurate cuts and alignment, making the process easier and more precise.
- Use Quality Tools: Investing in high-quality saws, chisels, and other tools will make creating Dovetail Joints much easier and more accurate.
- Practice: Like with many other woodworking techniques, creating Dovetail Joints takes practice to perfect. Start with small projects and work your way up to larger pieces.
- Use a Sharp Blade: A sharp blade is essential for creating clean and accurate cuts.
Dado joint

A dado joint is a wood joint in which a slot, or dado, is cut into one piece of wood to receive another. This type of joint is commonly used in cabinetry and furniture-making to join two pieces of wood at a right angle.
Uses and Tips:
- Uses: Dado’s joints are commonly used for shelves, cabinet sides, and similar applications where two pieces of wood must be joined at a right angle.
- Cutting the dado: The dado can be cut using a table saw, router, or blade. It’s important to ensure that the dado is straight and of the correct depth so that the pieces will fit together correctly.
- Measuring and marking: Before cutting the dado, measure and mark the location and width of the slot. Make sure to double-check your measurements before cutting, as mistakes in this step can be difficult to fix.
- Alternative joints: Depending on the application, other joints, such as a mortise-and-tenon or a rabbet joint, may be used instead of a dado joint.
- Safety: Always use proper safety equipment, such as eye and hearing protection, when using power tools to cut the dado.
Tongue and Groove
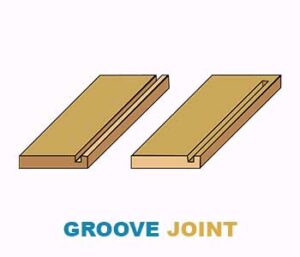
Tongue and groove joints join two pieces of wood together to create a tight, seamless connection.
Use and Tips:
- Flooring: Tongue and groove flooring is popular for its tight fit and seamless appearance.
- Paneling: Tongue and groove paneling can create a traditional, rustic, or modern look in a room.
- Cabinets: Used in cabinet construction to join a cabinet’s sides, back, and shelves.
- Furniture: Joints can be used in furniture construction, such as for the back panel of a bookcase or the sides of a chest of drawers.
- Wall cladding: These joints are also used in wall cladding, where boards are joined together to create a smooth, seamless surface.
- Ceiling: Tongue and groove joints can be used in ceiling construction to create a clean, finished look.
- Decking: Decking is popular for its tight fit and easy installation.
Mortise and Tenon

The mortise and tenon is a woodworking joint used to join two pieces of wood at a right angle. The mortise is a rectangular, or square hole cut into one piece of wood, while the tenon is a projecting piece that fits snugly into the mortise. The two pieces are then glued or pinned together to create a strong, long-lasting joint.
Mortise and tenon joints have been used for thousands of years and are prized for their strength and durability. They are often used in furniture, cabinetry, and other woodworking applications where a strong, seamless connection is desired. The joint can be reinforced with pegs, nails, or other fasteners for added strength, making it a versatile and reliable choice for many woodworking projects.
Uses And Tips:
- Furniture: The mortise and tenon joint is often used to construct chairs, tables, and cabinets.
- Doors & Windows: Join the frame and panels of doors and windows.
- Staircases: It is used to join the treads and risers to the stringers in staircase construction.
- Decks: Rail posts to the railings in deck construction.
- Cabinets: The sides, back, and shelves of cabinets.
- Structural timber: The construction of traditional timber-framed buildings, where it is used to join the timbers together to create the frame.
- Outdoor structures: The construction of outdoor structures, such as pergolas, arbors, and gazebos, for their strength and durability.
- Wood carving project: creating wooden figurines, toys, and other decorative items.
Birdsmouth Joint

A birdsmouth joint is a type of woodworking joint used in roof construction. It is a mortise and tenon joint used to connect rafters to a ridge beam in a roof structure. The birdsmouth joint gets its name from its shape, which resembles the open beak of a bird.
The birdsmouth joint cuts a slope into the bottom of the rafter, creating a “notch” or “pocket.” The rafter is fitted onto the ridge beam, with the sloped cut resting on the beam. The joint is then secured with nails or screws.
Cross Lap
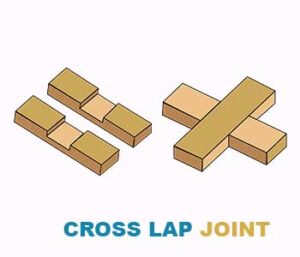
A cross lap joint is a woodworking joint used to join two pieces of wood at right angles. It is also known as a cross halving joint. The joint is made by cutting a half lap on each wood piece, creating two complementary halves that fit together to form a strong and stable connection.
The cross lap joint is often used in the construction of boxes, drawers, and other small wooden structures, as well as in the construction of furniture and cabinetry. It is a simple joint to make and is strong and stable, making it a popular choice for many woodworking projects.
Splice Joint
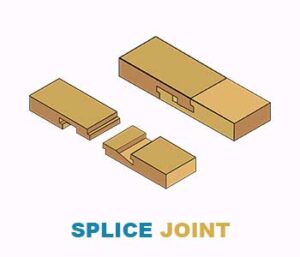
A splice joint is a woodworking joint used to join two pieces of wood end-to-end. It is a simple and efficient way to extend the length of a piece of wood without adding extra weight or affecting the strength of the wood.
The splice joint is made by cutting each piece of wood to the same length and then cutting a complementary joint at the end of each piece. The two pieces are then positioned end-to-end, with the joints facing each other, glued, and clamped together. The joint can also be reinforced with nails or screws.
The splice joint is often used in the construction of furniture, cabinetry, and other wooden structures, as well as in the construction of shelves, picture frames, and other household items. It is also used in woodworking projects where the length of a piece of wood needs to be extended, such as in the construction of tables, bookcases, and other larger structures.
Conclusion
Wood joints play a crucial role in woodworking, as they help to connect two or more pieces of wood strongly and stably. There are many types of wood joints, each with its unique benefits and uses. Some of the most commonly used wood joints include the mortise and tenon joint, the tongue and groove joint, the birdsmouth joint, the cross lap joint, and the splice joint.
When choosing a wood joint for a specific project, it is important to consider the strength and stability of the joint, as well as the overall design and appearance of the finished project. With careful planning and attention to detail, wood joints can create strong and durable structures that will stand the test of time. Whether you are a professional woodworker or a DIY enthusiast, understanding the various types of wood joints and their uses is essential to creating successful woodworking projects.
Table of Contents


![Best Woodworking Books for DIY, Carpentry & Woodworker In 2024 [Updated Version]](https://woodworkingarena.com/wp-content/uploads/2019/07/Great-Woodworking-Books-768x476.jpg)
![45 Top Woodworking Tools Using Guide [Beginner to Expert]](https://woodworkingarena.com/wp-content/uploads/2019/06/woodworking-tools-2-768x512.jpg)